Wednesday, 3 December 2014

Timed Assessment - In the Role of the Designer


Overall I'm happy with how my design is been created and I think Samara did a great job and creating my design to the best of her ability, She was very professional when she was creating the look however I was slightly anxious about the time however she got it all done in the given time period. The nose contour is amazing and white base is extremely even, she also remembered to blend the white base down the neck and onto the ears which was what I wanted. 

One improvement would be the eyebrows as I would have preferred them slightly lower down which would have helped blended the eye shadows better, I personally think the eye brows were always going to be the hardest thing as the designer meant creating new eyebrows on top of the blocked out eyebrows. I feel the eyebrows look slightly Ronald McDonald like as they are very rounded which I would have liked them more straight, however I know the eyebrows were always going to be the difficult part as I am to much of a perfectionist when it comes to my own eyebrows. I think I would have liked slightly more lip colour and a little more blush. 

Putting that aside I loved everything else and she did an amazing job at blocking out my eyebrows as she was very nervous about doing that, so we made sure to practice so she could do it on the day and she did great. I've really enjoyed working with Samara for this entire project. 

Tuesday, 2 December 2014

'Elizabeth The Golden Age' Makeup Comparison


http://images2.fanpop.com/image/photos/13600000/Elizabeth-The-Golden-Age-
cate-blanchett-13636410-1024-576.jpg
I think there are a number of similarities to my final design and the make up Cate Blanchett wore for example the typical pale skin that is nearly white. Another similarity is the use of the same colour blusher on the lips and on the cheeks. Another is the eyebrows you can hardly see them which is what I incorporated into my design as I blocked out the eyebrows.

http://madamepickwickartblog.com/wp-content/uploads/2010/09/marketing8.jpg


The differences with my design as the make up Cate wore in the film to portray Queen Elizabeth I is the dramatic contouring of the nose in my design also the use of fake lashes and black mascara in that era they didn't wear mascara. Another difference is the fact I decided to create new eyebrows which are very bold.

https://blogger.googleusercontent.com/img/b/R29vZ2xl/AVvXsEgb4beauqQ5JKf5mxv7nTPXswi5RZr8Pjtgx6zgRID-rxCzqbHA5yBFkCNW5p2nwFQVL8ab9DihI-obC33iiu0EDHSFdmExWgsCU-XoXEeJUXDQjlIXw71HEZXcoYlcbjofgoRz8ICE4q8L/s1600/
Elizabeth--The-Golden-Age-upcoming-movies-241718_1500_1000.jpeg


Inspiration for my final 'New Elizabethan' Makeup Design


Makeup Artist - Alex Box

https://blogger.googleusercontent.com/img/b/R29vZ2xl/AVvXsEgb30PSuQQOzGCbOvm4t4j8fYymEekPkBzpIFJluvg-2VWMpvmpfbvyj2ugRG4YZ1kq72Gls41bFep-hnWspREXWrNUDGF8OPPo0XJJOWz92SQrr7nArUbUoo7MDskx4sGta_mdLYNJuMw/s1600/alex+box.jpg


http://1.bp.blogspot.com/-sh-C6Hd6YgI/Up9WsKgaucI/AAAAAA
AAAXk/PxH8qhDrrcM/s1600/alex+box.jpg
I was research Elizabethan Inspired Makeup and I came across this photo shoot Alex Box did the make up for. I instantly thought Elizabethan just from the colour of face which is white, this was very typical for the Elizabethan era. I created my face chart before I came across these images and thought it had a lot of comparisons to the work by Alex Box for example in my design the skin is very pale also the eyebrows it looks as if Alex has blocked out the eyebrows and created eyebrow higher on the forehead again this is very similar to my design as I want to create new eyebrows however mine are drawn on top of the blocked out eyebrow. 


Tuesday, 25 November 2014

Second Practice of My Design - MUA Samara


So this was Samara's second practice of my 'New Elizabethan' design and it went amazing, I was so pleased with how it came out as it was exactly what I envisioned. I think Samara really appreciated the stencil's I made her to help with creating the eyebrows easier as she struggled with getting them perfect on both sides in the first practice, the stencils also helped to speed the eyebrow process up. I definitely preferred how Samara blocked out my eyebrows this time as we didn't put powder on before putting the creme makeup on top. I told her an easier way of creating the nose contour which was just to use three color's and to start with lightest colour and to gradually use a stronger colour. I think we just need to practice getting the design on to my face quicker. But overall very pleased with this.

Monday, 24 November 2014

Timed Assessment for Samara's 'New Elizabethan' Makeup Design - In the Role of the Makeup Artist


Today I had my Timed assessment where I was the makeup artist creating Samara's design. We'd practiced a couple of times however each time she'd changed it a little which in a way made it difficult to remember what need to stay and what needed to change in the design. However that being said we stuck pretty much to the Face Chart with a little alteration for the Timed assessment and I was extremely pleased with how it came out. We both think this was the best I've ever done in re creating her design. 

We practiced the night before the timed assessment and it had gone horribly wrong as I'd used too much of the creme product, however I personally think this was a good thing as it helped me know what not to do for the actual timed assessment. I was pretty nervous before the timed assessment as I was worried I'd forgotten something which hadn't except for my cape so we used a black towel round her shoulders in order for not to get any makeup on her clothes. 

I think this was best recreation as I learnt from the practice sessions that you didn't need a lot of product when creating the stroke marks which I put into practice on the day. I stayed very professional and also I tried to keep very tidy as we had quite a bit of makeup on the table so I made sure to have a bin pile of all my disposable mascara wands and sponges. I finished the makeup first and was able to take photos first of her design.

Overall this process has really made me believe that it is all about practice makes perfect which what Samara and I did as I was determined to execute her look how she wanted it. I really enjoyed working with Samara as she was very truthful with me and told me straight what she didn't like and what she wanted me to change but at the same time praised me on my on the things she liked. She created a very easy step by step guide for me which she made very simple and easy to read if I needed it, she also took pictures of parts I'd done in the practice sessions that she liked. 


First Practice of My Design - MUA Samara
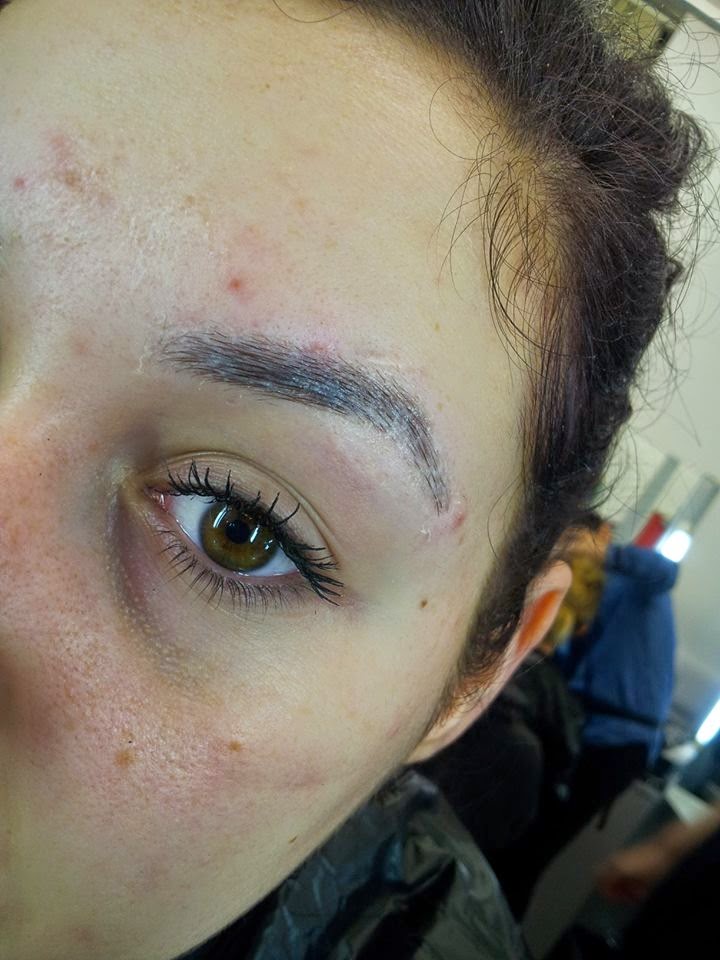


Two Layers of Pritt Stick to Block out my Eyebrows


We decided to try to methods of Blocking the colour of my eyebrow out, the first image is powder over the dry glued eyebrow and the second image is trying a range of different tone concealers.


We found that the we preferred the concealer side as it didn't look powdery like the other eyebrow as we found putting creme on top of powder made the eyebrow dry and patchy. 


This is what happened to the eyebrow we powdered first before putting the creme on top, as you can see it was very patchy and there was nothing we could do to sort it out other than to start again.


Samara found creating the thin black line difficult as she was doing it free hand and with a creme product. I decided that I was going to make her a stencil so that it easier and then both eyebrows will be exactly the same as it will help to speed up the process.


Samara did an amazing job at contouring my nose and inner part of eye, I was really happy with how she blended it we just need to make the process faster.


Again Samara did a great job at contouring and putting my blusher on, I told her to us a business card to create a very strong contour line, I think next time we will use a less bright blusher so that I stay true to my Face Chart.


Analysis of Design

From the first practice of my design done by Samara, I've decided to create stencils for eye brows so that it's an easier and quicker process for her. I've also decided that the eyebrow will be powdered after the creme is put on in order for the makeup not to go patchy like it did on the first try. Also we will powder after the eye makeup is complete as we found that where Samara was leaning to do my eye makeup and eye brows it was removing the base and making the powder patchy. We will need to practice more in order for Samara to be more confident and to be able to do it under 2 hours for the timed assessment.

Step By Step Pictures of my Final Design


Step 1


Step 2


Step 3 and 4


Step 5


      Step 6,7 and 8


Step 9


Step 10

                                                                        Step 11 and 12
                                                                  

Step 13


Step 14


Final Look


My Step by Step Guide of My Final Design


  1. Start by Blocking out the eyebrows with a Glue stick – Use a spatula to spread glue onto to eyebrows evenly
  2. Remove any excess Glue with a cutip and makeup remover - Leave eyebrows to dry.
  3. Apply a matte Primer all over the face – apply eye shadow Primer to the eye lids.
  4. Apply an even layer of white foundation all over the face and down the neck using a sponge or foundation brush.
  5. Once the glue is dry, apply Supracolour White crème with a sponge onto the eyebrows to block out the colour – then go over with White foundation and blend out using a sponge.
  6. Before drawing on the new eyebrow set eyebrows with Illamasqua loose powder with a sponge.
  7. Using a liquid liner use the stencil to create a thin black line on top of the blocked out eyebrows.
  8. Using the mid tone brown in the Smashbox Palette begin by carving the nose and front part of the eye contour – take some of the eye shadow onto the eyelid
  9. Using a dark brown eye shadow deepen the eye shadow that has already been put on.
  10. Using a Black eye shadow deepen the inner part of the eye blending downwards slightly.
  11. Using a white eye liner, line the waterline pulling it down the lower eyelid.
  12. Use a mixture of a dark brown and black eye shadow to underline where the white eyeliner has been placed.
  13. Apply mascara to the top lashes only and apply false lashes.
  14. Apply the loose powder all over the face and also the lips
  15.  Then use a card as a stencil to contour with and then apply a pink blusher on the apples of the cheeks.
  16. Lastly apply the same blusher on the lips.


Equipment Needed:
  • Disposable Sponges
  • Disposable Mascara Wands
  • Stainless Steel Spatula and palette
  • Cape
  • Glue Stick 
  • Baby Buds
  • Makeup Remover

Products Needed:
  • Illamasqua Matte Primer
  • Illamasqua Skin Base in White
  • Smash Box Full Exposure Palette
  • Kryolan Blusher Palette
  • Illamasqua Loose Powder
  • Illamasqua White Eyeliner Pencil - Elate
  • Illamasqua Sculpting Powder Duo
  • MAC Cosmetics Eyelid Primer in Painterly 
  • Mascara
  • Kryolan Supra Colour Palette

Timed Assessment as the MUA for Samara's 'New Elizabethan' Design


Sunday, 23 November 2014

Second Practice of Partners 'New Elizabethan' Makeup Design (FAIL)


This was my Second attempt at practicing Samara's Final Design, however it didn't go to plan as unfortunately the both of us weren't concentrating so this Practice didn't work out. I did however learn what not to do for her Design.


As you can see the black Supra Colour has creased - I need to make sure to set it with a Black Eye shadow to prevent it from Creasing on the Actual Day.

I went to far inwards with the black supra colour which then covered up the red colour.

I applied to much Black Supra colour to the lips as there was meant to be some white peaking through, I also pulled the black upwards and down when Samara wanted it just going outwards.


Again I pulled the black to far inwards making it look to dark, it also covered up the bare skin that was meant to be peaking through. 

The only Successful thing from the Practice was neck makeup.

Bare skin was meant to be peaking through on top of the eye brow however I covered it with White.

How she wanted the ear makeup (Success)